Just a few days ago, I found a website that had a cute jean skirt made out of old jeans and a t-shirt. It was comprised of panels, had this cute shoe lace flower on the front, and sized for a 2 -3 toddler. That was perfect for my lil' AC. I was searching for a pair of old jeans big AC had worn holes through when I found an old denim shirt that belong to the Mr. It was perfect for repurposing. I gave the shirt another washing and set out to follow the instructions to make the skirt. Sounds good, so far, right? Well, in the mean time, my PC had rebooted itself and I lost the website. I've searched for 3 days and I still can't find it. I've got other projects waiting to be completed but I'm stuck! I'm obsessed with finding that website. So, if you happen to run across a website which tells you how to make a paneled jean skirt out of an old pair of jeans and a t-shirt and uses shoelaces as the stems of a flower on the front of the skirt, PLEASE let me know. I'm really wanting to make that skirt for lil' AC before she's too big to fit in it.
I am happy to say that I did force myself to start tracing the pattern pieces to a little summer seersucker outfit I want to make for lil' AC. It's McCalls 5568. I no longer cut any of my patterns. For several years now, I use inexpensive interfacing to trace out the pattern pieces. This leaves the original pattern in tack, and allows me to get full use out of ALL the different size. (When a pattern has multiple sizes printed on the sheet and you cut one size, you loose the other sizes.) I usually buy the interfacing by the bolt and when it's on sale. It last a good long time. Also, the pattern pieces are much more durable. I simply lay the interfacing over the pattern and use a highlighter to trace the lines and copy all the markings. The interfacing is thin enough to see the pattern lines right through it. I roughly cut the interfacing pieces and then lay them on the fabric where I do a much more accurate cut. On a few occassions, I have not even pinned the interface pattern piece to the fabric because the pattern piece can stick fairly well to some types of fabric. Using interfacing to cut out pattern pieces works great for me.
Credo,
Lisa

Wednesday, April 21, 2010
Thursday, April 15, 2010
Tulle Hair Band
To go along with the Simple Sash Sundress, lil' AC needed something for her hair. Originally, I thought I would make the hair band out of the yellow cotton dress fabric but I thought the outfit needed more white to make the rest of it stand out more. I had some plain white cotton but it just seemed like too much white and that's when tulle came to mind. I had measured where the headband would go on my daughter's head. Then subtracted 4". I used the 6" wide tulle that comes on a spool. Love that stuff. I use it as ribbon when wrapping gifts or to decorate a plain basket. I think tulle on a spool is a staple for all crafters. So, I cut the 6" wide tulle the length of her head minus 4". I then cut a piece of 3/8" black elastic 5" long. I chose black elastic because lil' AC has dark brown hair and it blends well. I then scrunched up one tulle end and placed it over the elastic. The tulle covered approximately 1" of elastic. I then stitched the tulle to the elastic about an 1/2 from the edge of the elastic. I did this to the other side and then trimmed both ends of the hair band close to the stitch line. I took a piece of white ribbon and then wrapped it around the tulle/elastic seam stitching. I wrapped about 2" worth of white satin ribbon and then tacked it in place, by hand. It looked like this...


To add a fabric flower, I cut a circle out of the yellow cotton dress fabric. I then cut 2 pieces of white tulle slightly smaller. The tulle circles were approximately the same size, about 2.5" in diameter. To make the ends curl, I burnt the ends with a lighter like this.
I burnt the inner petal more than the outter to make it smaller. I then layered the circles. The cotton was at the bottom followed by the tulle from largest to smallest. I then pinched the center with my fingers until I was happy with the way it looked and then used thread and needle to keep it's shape. I then added the extra button I made for the dress to the center. I just attached it with needle and thread.

Here's the finished product...


Credo,
Lisa
Tuesday, April 13, 2010
Simple Sash Sundress
A couple of weeks ago I made lil AC a dress from Kari Mecca's Sewing With Whimsy.

The dress I chose was the Simple Sash Dress. This is the 1st dress pattern that I used from her book. I found the instructions to be well written and easy to follow. The only problem I had was putting in the bias bound placket. However, since this was my 1st time doing one, I think it turned out okay. The instructions for French seams were very clear and this was also the 1st time I did an entire dress with French seams. I think it makes a world of difference and I really like how clean (lack of stray threads) the inside looks.
Here's how lil AC's dress turned out...
The front

Close up of the trim on the bodice and hemline:

The back of the dress:

Close up of the back and buttons
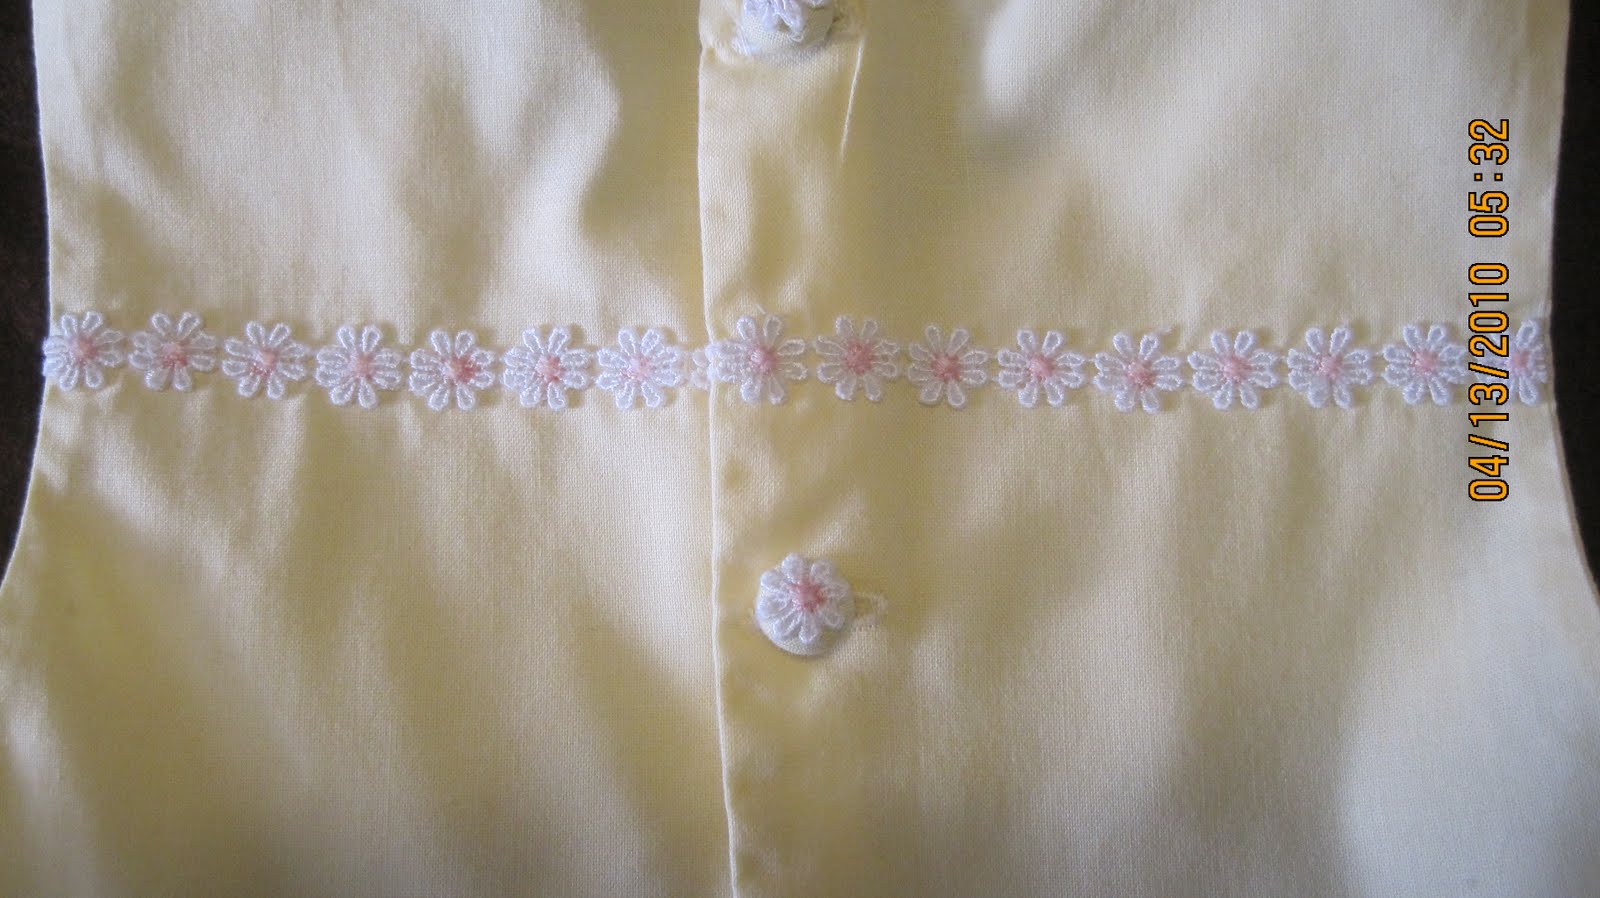
I was pleased with the way the trim lined up on the back. I started to look for vintage type buttons but I couldn't find anything I was really happy with. So, I just decided to purchase on of those button cover kits. I used the yellow cotton fabric and to separate the flowers from the trim, I just cut the thread between the 2 flowers. Using my sewing machine, I stitched the flowers onto the yellow cotton fabric and then followed the instructions for creating a button. It suggests that light or thin fabric can be doubled. I tried that but the fabric was really too thick to snap in that button cover. Here's a close up of one of the extra buttons I made and ended up using it in a hair band for lil' AC.

It was a good little sewing project and I'm glad I got the book!

Credo,
Lisa
Monday, April 12, 2010
Bunny Hair Pin
My SIL made this cute little bunny hair pin for lil' AC for Easter. She sold quite a few of these to the mom's at her kids school. She's crafty and enjoyed making them. Certainly a win/win!
 She started off by covering the hair clip in with 3/8th light pink ribbon.
 The body is done next. The body consists of 2 bottom body loops which are just like the loops for the ears and then the full body loop which includes the face. One bottom body loop is done in the light pink, approximately 3" in length. The 2nd body bottom loop is done in white and is slightly longer in length (maybe 3.25"). The the last loop makes up the face and the body. Essentially, you make a figure 8 with your white ribbon, making sure to make the top of the 8 smaller then the bottom of the 8. Then you will use your glue gun to glue down the top of the 8 to form the face. The length of the body ribbon is approximately 6" long. Next you can add the ear loops which are made from a two 3" pieces of ribbon. The inner ear loop is pink and the outter is white. You finish up with the wiggle eye and the 1/8" blue ribbon for the bow.


She also made this really adorable duck hair clip!

Credo,
Lisa
It's been a while...
Time... it just slips by too fast. Although I have been absent from my blog, I have been busy (working, being a mom, sewing, etc.). It seems that I have been doing a lot of blog surfing too. I am amazed at all of the talented women out there who seem to do all the things I do but still manage to blog regularly and create such beautiful works of art. I have great respect and admiration for your talents and drive. I have so much learning to do.
So, what have I learned lately? Well, the day before my MIL's 90th bday party I decided that little AC's dress needed a slip to go underneath it. Luckily, I had purchased a pattern from Martha Pullen, Fancy Slip and Panties, which would work. Plus, at my last MP event I had purchased some extra fabric and I had won some free lace that would work perfect for the slip. The slip was easy to put together but I didn't do it exactly as the instructions suggested. Because the dress I made, had a wide arm hole and lower neckline, I was afraid that the lace at the neck and arms would peak through. That's not what I wanted. I needed to finish off the neck and arm seams a bit differently. I decided to set my serger, Pfaff 788, to a flat rolled hem. This is where the learning started. I'd never done this before on my serger. In fact, I think I'm like most people who have a serger... I'm terrified to move any of the setting for fear it will not work again. I'm slightly comfortable with changing the thread but remove one of them or even remove a needle??? Are you kidding me? On any normal day, I'd say "No, way! Stay the heck away from my serger." Who knows what possessed me but I did give it a whirl. I 1st tried the 3-thread rolled hem and I thought it was too bulky. Then I tried the 2-thread rolled hem. Just perfect! I followed the manuals instructions and had no problems. Of course, I must admit that I have yet to put it back to a regular 4-thread serger stitch but that's beside the point! When I serged the 2-thread rolled hem on both the neck and arm seams, I did not shave off any of the fabric. I just serged the edges and then took it over to my Viking Designer Diamond. (Before I forget, I also used the 2-thread rolled hem to attach the lace to the ruffled trim at the bottom of the slip.)
 I turned the serged hem over about 1/4" and then used the shell edging stitch (#26) to finish the edges.


So, what have I learned lately? Well, the day before my MIL's 90th bday party I decided that little AC's dress needed a slip to go underneath it. Luckily, I had purchased a pattern from Martha Pullen, Fancy Slip and Panties, which would work. Plus, at my last MP event I had purchased some extra fabric and I had won some free lace that would work perfect for the slip. The slip was easy to put together but I didn't do it exactly as the instructions suggested. Because the dress I made, had a wide arm hole and lower neckline, I was afraid that the lace at the neck and arms would peak through. That's not what I wanted. I needed to finish off the neck and arm seams a bit differently. I decided to set my serger, Pfaff 788, to a flat rolled hem. This is where the learning started. I'd never done this before on my serger. In fact, I think I'm like most people who have a serger... I'm terrified to move any of the setting for fear it will not work again. I'm slightly comfortable with changing the thread but remove one of them or even remove a needle??? Are you kidding me? On any normal day, I'd say "No, way! Stay the heck away from my serger." Who knows what possessed me but I did give it a whirl. I 1st tried the 3-thread rolled hem and I thought it was too bulky. Then I tried the 2-thread rolled hem. Just perfect! I followed the manuals instructions and had no problems. Of course, I must admit that I have yet to put it back to a regular 4-thread serger stitch but that's beside the point! When I serged the 2-thread rolled hem on both the neck and arm seams, I did not shave off any of the fabric. I just serged the edges and then took it over to my Viking Designer Diamond. (Before I forget, I also used the 2-thread rolled hem to attach the lace to the ruffled trim at the bottom of the slip.)


I was happy with my 1st attempted at using the shell edging stitch. Here's what the slip looks like:

I also decided to use French seams for the side and shoulder seams. The Fancy Slip pattern had instructions on how to do French seams but I had just tried them with the dress and was happy with the results. I decided to stick to those instructions (Kari Mecca's Sewing with Whimsy) because I had been successful the 1st time I tried it. I did briefly look at slip instructions for french seams and they did seem easy to follow.
I chose to put some embroidery on the slip to dress it up a bit more. I made this decision BEFORE I sewed the side seams. Basically, right after I cut it out. I chose white on white so that it makes the design more subtle. I used Martha Pullen's 2009 May Redwork design for the slip front. Since the design is approximately 3.5" tall, I knew that I wanted the design to start no farther down then 2" from the neckline. Since I still had to finish the neckline but I wasn't sure how much the seam was going to take, I just measured 2" down from the neck edge and marked it with a disappearing ink. To center the design, I folded the slip front in half (side seams together), marked where it reached the 2" neck mark and then came down another 1.75" to make the final CENTER mark. Since the design is 3.5 inches tall, I needed to find the center point (3.5/2= 1.75"). I used Floriani Perfect Stick because I don't have to "hoop" in the traditional sense. Perfect Stick has a sticky side which allows you to just place your fabric onto the hoop without having to stretch it into your hoop and get it perfectly aligned. I use Perfect Stick a lot! I take the appropriate hoop and trace the hoop size onto the back of the Perfect Stick and cut it out. I then remove the relief paper which exposed the sticky part. I place the stabilizer on a table with the sticky side up and then put my hoop on top of the sticky stabilizer in the shape of my hoop. I make sure that it's properly covering all corners of the hoop. I put my hoop onto my machine and then I can just drop my fabric onto my hoop and smooth it out. If I don't get it aligned right the 1st time, it's VERY easy to pick it up and readjust. Super simple and I love this technique! In fact, I started the embroidery design and then ran out of the house to go to the movies with the family. When I came back, it was all finished and looked like this...

I like the design because it's delicate and that's what I wanted for little AC's slip.

For this little sewing project, I learned how to use my rolled hem on my serger and that I love stitch #26 (shell edge) on my Designer Diamond.
Credo,
Lisa
Subscribe to:
Posts (Atom)
