Pinterest

Friday, May 1, 2020

Father/Daughter Dance - Vintage Circus Theme Part 1

Hello There!

  For the past 7 years, I've been helping with the Father/Daughter Dance at my daughter's school. We've got a great group of women who come together and really put their heart and soul into the event. We get no real funding from the school but these women are incredibly giving of their time, creativity and money. I've truly come to respect and love each one of them for all their many talents and their ability to give freely. They are an amazing group and I'm so very lucky to have met them!

  My main responsibility has been the decorations for the hall. There's nothing fancy about this hall. It's a pretty sterile industrial looking hall, in my opinion. We try really hard to make it look as magical as we can the night of the dance. This year's theme was Vintage Circus with deep reds, blacks, golds, and black and white harlequin pattern as the main color pallet.

 Our breeze way (area between the church and the hall) was just renovated and we wanted to showcase this area. I kept staring at this brand new adjacent area (which is just off of the renovated breeze way) trying to figure out how to dress it up. 
When I saw the fencing, it reminded me of the bars seen in a circus wagon. So, I dressed them up to look like circus wagons and had this be the entrance for the dads/daughters to come through. At the check-in table (located at the top of this walkway), I also had a small speaker system playing circus music off my iPhone to set the proper mood. The dance was in February and we were fearful of some showers. Because this fencing was inside of the roof line, I was hopeful that any decorations would not get ruined by some rain. We actually did have a very quick 15 min downpour and the decorations did get slightly wet due to the rain being pushed by the wind but it all worked out.  Here's what it looked like once it was all decorated.
All the yellow stars were cut on my Cricut.
 
 The giraffe was my favorite animal in the circus wagon train!

The CIRCUS font is called Carousel and I used it heavily in a lot of the decorations.  The cage background is just black butcher paper the school had which meant it was not cost to me! (Love that!). Some of the fencing sections were the same size. I laid out two rows of black butcher paper plus 12".  The top row over lapped the bottom row by 3" or so and then used dollar store clear packing tape to adhere them. The circus animals were adhered to the butcher paper with spray adhesive. Several years ago, we learned that you can't go cheap on the spray adhesive that can be found at the dollar store for these large prints. We've had great adhesion with products like 3M or Scotch brands. We also try to use the spray adhesive the night before (or earlier) and allow them to thoroughly dry before we hang them. The day of the dance, we wrapped the butcher paper around the outside bar and taped it back onto itself in the back. We were also very careful to NOT tape anything to the new fence. We taped the top of the black butcher paper to the back of the red wagon tops. This kept it from flying or buckling in the wind. The animals were printed by a mom who's got a connection to someone who works at a print shop. For the last several years, she donates the images for us in exchange for service hours. It's a win/win!
I used my Cricut to cut the tops of the wagon. I used the Larger than Mat technique to cut the tops of the wagon. I loaded up my 12x24 Cricut mat with two 12x12 sheets of red paper and ensured they touched in the center to cut my wagon tops. I then cut out a large cardboard rectangle the width of the fence and then glued the wagon top to the cardboard to ensure stability. I also punched holes in the cardboard and ran thin floral wire through the holes which made attaching the wagon tops the day of the even super fast, easy and no tape required.

The yellow wheels were also made on my cricut using 12x12 paper.I cut a long piece of cardboard and wrapped it in red butcher paper (free from the school!) and then glued the wheels on at the right height so that they just kissed the top of the brick. Bent wagon wheels were not allowed! I also punched holes and attached floral wire to attach them to the fencing. Sorry, I should of taken a picture of the back to get a better idea of the wiring.


That was our check-in table. Aren't those centerpieces great?? We have a mom who has been churning these out for us for the last couple of years. We worked on the prototype but she runs with the rest of it and does EXCELLENT work!

The elephant, giraffe, motorcycle riding bear and the harlequin paper were found here: Mark Montano  We sent the images to a print shop to ensure vivid images. I also had the mirror image printed so that the front and backs looked exactly the same. I made some "glitter sticks" which are just bambo skewers from the dollar store that are painted with white glue and then sprinkled with glitter. The glitter sticks were sandwich in between the mirror images and then poked/glued into the harlequin base. The little harlequin bases are made out of floral foam from the dollar store and wrapped in the harlequin paper. If I remember correctly, I think we got 6 harlequin bases out of each pack of dollar store floral foam. The red tubs are also from the dollar store and were picked up around Christmas time. We actually didn't get enough at Christmas time. Ugh!! We ended up buying pink ones (Valentines decor) and just spray painted the outer rim red since the tops were covered in black glitter adhesive paper which was purchased at efavormart for 7 bucks and some change for a pack of 10. (These sheets were bigger than the ones Michael's has and sells for $1.29/sheet in my area.) The gold stars were cut on my Cricut with glitter foam and hot glued to the red tubes.


The new updated breeze way required some decorating too.

 The circus sign was one of the printed images that we spray adhered to a large piece of cardboard. On the columns, I wrapped some wire around the top and bottom - think a string of wire  wrapped around the pillar and twisted at the ends with pliers to form a ring of wire. I tucked the red and gold tulle over the wire at the top and base.
We had round tables in the hall and a few rectangle tables in the breeze way. We had both black or red tables clothes as the base and then had gold glitter runners which anchored the center pieces. The linens and runners were donated for the evening.
 The popcorn arch... The popcorn boxes were about 4.5' tall and cut out of cardboard. I used salad plates to make the 3 round arches at the top and then tapered in the bottom of the boxes by 3 - 4 inches. I then wrapped the cardboard in white butcher paper from the school. The stripes are red streamers from the dollar store. The popcorn box sides were then just taped together from the inside with clear packing tape from the dollar store. The arch I picked up from Amazon for 50 bucks (Portable Arch). I would use caution with this arch as it's not very sturdy and I would probably only use it indoors as I think the wind may knock it over easily. The popcorn logo (oval and "Popcorn") were cut on my Cricut using the Carousel font and a popcorn shape for the o's in popcorn. 
Our hall is massive and can be intimidating to decorate. The ceiling always perplexes me due to the sheer size of it and the church has many restrictions on what can and cannot be done. This certainly forces us to really use our creativity. I've not learned how to take a photo of the ceiling decorations so that you get a similar feeling as when your are there and experiencing it. I'll keep working on it! 

This year I knew that I wanted to have flying trapeze (all females) flying thru the air and lots of pennants/banners with stars.When hanging things on the ceiling we use wire we pick up from Lowes hardware (Hillman 19 Gauge Galvanized Steel Wire). The wire is better than fishing line or any string we've tried as it minimizes sagging. We have found that taping our decorations to the wire and then hanging the wire is the most efficient way to get this task done. It allows you to manipulate the placement of the decorations without killing yourself on a ladder moving things around. We do end up throwing all the wire and nearly all the taped decorations away at the end of the dance. We use the clear packing tape from the dollar store to adhere the decorations to the wire.
 Don't you love that giant elephant? We got lucky and were able to borrow it for the evening. That big guy was right next to the DJ who used some back lighting to highlight him the entire evening. I'm pretty sure you can pick him up on Amazon but I was not able to find the link.


The trapeze artist were hula hoops covered in red streams from the dollar tree. I was hoping to get dollar store hula hoops but they did not stock them in time for the dance and I ended up paying way too much for them on Amazon (Detable Hula Hoops) but they do break down for better storage! The trapeze gals were cut on my Cricut (larger than mat style) with card stock and I also cut some out by hand (cut a template w/my cricut) using the school's black butcher paper. Although, I liked that the hand cut ones were all one piece the butcher paper was kind of flimsy and I ended up gluing floral wire to the extremities to keep them in the desired position and to keep them from curling. Since these were hanging from the ceiling and the lighting would be muted, the wire was not seen and blended into the black paper. I did find red stars from the dollar store (I think 30 for a buck) and then used my cricut to cut out yellow and black ones.

In a separate post, I'll share a few more stations (craft, beverage and candy/dessert), the invitations the girls receive, the photo backdrop and a few more decorations.

Credo,
Lisa

For Part 2

Wednesday, April 29, 2020

Baby Shower Paper Flower Rose Gold Border

Hello,

  My niece got a Cricut for Christmas but hadn't really used it much. She then became pregnant with her 3rd child and wanted to use the Cricut to make her invitations and decorations for the shower. She spent the day with me and we went over some Cricut basics. We created a sample invitation with an envelope.


  She also wanted me to show her how to make large paper rose to include in her decorations. There are plenty of How To videos. I did roughly follow the directions found on Sweet Red Poppy, https://sweetredpoppy.com/how-to-make-large-paper-flowers/ to make this Rose Gold Paper Flower banner backdrop for her Shower photos. I used foam core board to adhere the flowers and leaves. I also used floral wire to make hooks to make hanging up the banner easy. I used these instructions to make the Rose Gold leaves: https://www.youtube.com/watch?v=ydGL-Dyp7QU. I purchased the Rose Gold paper at Michaels but I had to go to several Michaels over the course of 2 weeks to get all the paper I thought I might need. I did get extra because the Rose Gold paper is only one sided meaning the Rose Gold color was only on one side while the other side is the color of brown craft/butcher paper.


Credo,
Lisa

Friday, April 12, 2013

Simplicity 5931 Easy to Sew Robe

Hello!

  I was going through my patterns and trying to do some organizing and THINKING about getting rid of some! I organize in terms of priority sewing. What I want to sew next, gets hung up on my wall so that I can see it. This seems to get me motivated.

  I came across Simplicity 5931. It's an easy robe pattern that I have made twice but have not blogged about it. Both times I sewed this robe was for Christmas gifts. The 1st one I made was 2 Christmas' ago. It was a thick fleece robe made for my niece. It was easy to sew and I followed the directions to the letter and had no problems. The fleece was a bit bulky at some seams but my machine was able to handle it just fine. I also used this pattern for this past Christmas. I sewed a cotton (light weight) robe for my girlfriend's 10 year old daughter. Personally, I don't really like robes, especially heavy long ones. Since my girlfriend's daughter is very petite. I thought a light cotton robe that stopped at or just below the knee might suit her well.

  A word of warning about this pattern... it uses a lot of fabric because of the length of the robe. Since I wanted a short robe, I cut out her size (child's medium) but used the child's small for pattern pieces 1 (front and under collar), 3 (back) and 5 (front facing and upper collar). I also did not sew on pockets. A light robe didn't seem to warrant pockets.
 
I did follow the directions very closely. It did call for slip stitching the sleeve hem but I chose to machine stitch that part. I also increased my stitch length to 3.5 and it seemed to give a smoother finish to the sleeve and top stitching. I did hand sew (slip stitch) the collar facing as directed in step 17.

 
As you can see in the picture above, I did serge all the seams. In most cases I serged the seam and then went back and straight stitched to secure the seam. Since the fabric is cotton, I expect it to fray much less since I serged the seams.
 
 
I also top stitched the entire front collar. I started from the bottom front and stitched all the way up and around the collar coming back down to the bottom front, as suggested in step 18. However, the directions suggest 1/2" from the edge. That's too big of a gap for me. I sewed closer to 1/8" from the seam edge.


Another word of caution when using interfacing for the collar. Do not use inexpensive interfacing like I did for the collar. When you go to iron the collar (after it's all stitched up), your fabric will start to pucker and can look terrible because the interfacing can not really take the heat from the iron. To try to mitigate this, I didn't use a cotton heat setting on my iron. I went to a cooler setting. This was still not ideal because it was still hard to press the cotton and I really don't think it's worth the extra effort to tip-toe around lesser quality interfacing. Save yourself the headache and use good quality interfacing. I think you'll be much happier for it.
 
 The sewing time was fairly quick. I don't think it took me more than 4 hours to sew the robe together. I did start and stop a lot. I think you might be able to get it done quicker, if you don't have to stop and start a bunch of times.
 
Credo,
Lisa

Sunday, March 3, 2013

Simplicity 2320 - Project Runway Dress size 4

Hi!

  I just completed Simplicity 2320 - the capped sleeve dress version which is the one on the upper right hand corner.


  In general, the dress came together easily and quickly. The only part that gave me a bit of trouble was inserting the yoke (pattern piece 1). In step 4, the directions say to pin the front yoke (right sides together) to the dress front (pattern piece 2) and stitch. Also, to make sure that you pivot your stitching at the small dots. I had a hard time just pinning the yoke to the front. What worked better for me was to pin one side at a time and stitch. I stitched in a U shaped fashion but worked one seam line at a time. I still had some issues with a little bit of puckering because my stitching lines were not straight in one corner.


However, I was able to undo the corner and fix it. I'd like to make this dress again but next time I will pin and stitch the base of the yoke before I start attaching the sides of the yoke. I think it might work out easier that way.

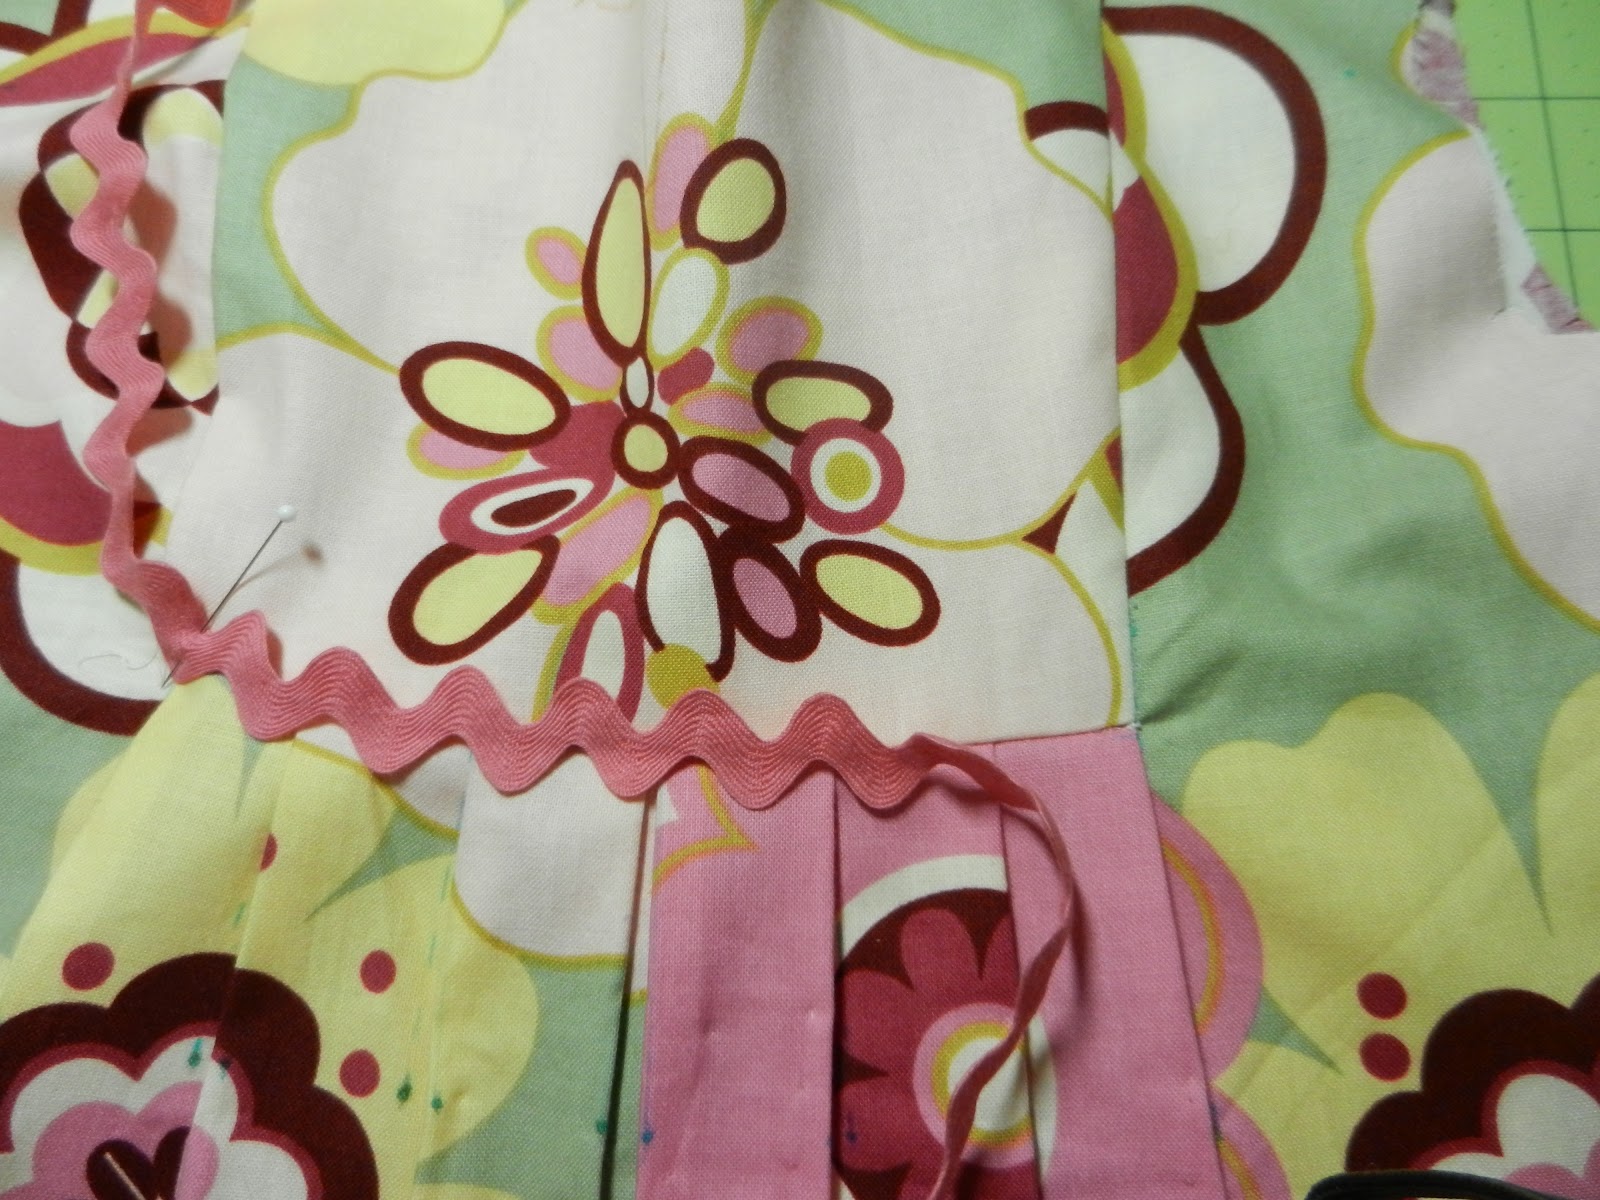
Once, I had stitched the yoke the way I wanted it, I went ahead and stitch the should seams as the directions suggest.  The fabric is from JoAnn's and I've had it a while. I wouldn't of picked this big and bold of a print for this dress buy Lil' AC was adamant that we use this fabric. After looking at the dress for a while, I thought I should add some sort of trim. I had some rickrack that would liven up the dress a bit. I had to open up the seams to slide in the rickrack. So, note to yourself, if you're going to add trim around the yoke, don't sew the shoulder seams first!

Pin rickrack in place.
Since the fabric was a bit bold, I wanted to make sure the sleeves were the same. So, I did what some refer to as "fussy cuts". I took the pattern piece and centered it on a flower and cut out only ONE layer. I then found the repeat pattern on the fabric and placed the 1st sleeve I cut out on the repeat to make sure they matched before I cut out the 2nd sleeve. Hope that makes sense.
I was happy to leave the dress with the just the rickrack accent. However, Lil' AC wanted that bow! So, we went from this:
To this w/the bow in the center:

The instructions call for a 12" zipper but I didn't have one on hand. Instead, I used a 9" invisible zipper. I temporarily tacked the back seem where the shorter zipper would end to see if Lil AC could get in and out of the dress. There was plenty of room to get the dress on and off with the shorter zipper.

I do recommend this pattern and would say the only "tricky" part was putting in that front yoke. I do like the little cap sleeves and the construction of them were new to me but they went in easy enough.

Credo,
Lisa

Tuesday, September 6, 2011

Cinderella dress - no pattern for Halloween costume??

Hello,

  Lil' AC has a very long list of princess dresses for me to make her. Of course, I've promised to make each one she's asked for. Since there were lots of sales going on over Labor Day weekend, we hit JoAnn's to buy fabric. I purchased 3 fabrics from the costume fabric rack to make this...

  1. Silver sparkle mesh - 1/3 yard (60'ish inch wide). Used for design on bodice. Regular price $6.99 -30% off = $4.89/yard. Cost for 1/3 yard = $1.63.  I have plenty left over and will be using the rest for the accessories (gloves, headband and possible necklace/choker).
  2. Blue Bell Solid Crushed Velvet Stretch fabric - 1/2 yard (58" width). Used for the bodice. Regular price 5.99 - 30% off = $4.19/yard. Cost for 1/2 yard = $2.10. I have a modest amount of fabric left over and will use this to make accessories (gloves, headband, and choker)
  3. Blue Costume Glitter Satin - 1.5 yards (45" width). Used for sleeves and skirt portion. Regular price $4.99 - 30% off = $3.49/yard. Cost for 1.5 yards = $5.24. I have almost nothing left over. Maybe 4" x 45" strip of fabric. I think it's enough to make the headband with.
The total fabric cost was $7.34 + tax. The remaining supplies I already had on hand (Velcro and bodice embellishment).

Lil' AC is between a 3T and 4T. She's thin (3T) but the length of a 4T is right for her. Use your judgement on the amount of fabric you will need for your Cinderella dress.

Since I had used Ashley's technique to make a colonial dress for my niece, it should be a snap to follower her instructions to actually make her the Cinderella dress. Things went very smoothly and I knocked out the dress in one day. (Well, that's not EXACTLY true... I did hand sew the hem the next morning.) There are a couple of things I would do differently when I go to make my next princess dress. (Remember, lil' AC has a very long list!). Instead of 3 strips of Velcro, I decided to use one long strip. I was happy with that variation but I would attach the Velcro differently next time to avoid those 3 sew lines.
When constructing the back closure, Ashley suggests folding the seam over 1/4" and then another 1/4" and sew in place. That creates the sew line on the far left. Next time, I think I will just fold over 1/2' and glue baste that down and sew the Velcro piece on to permanently hold down that seam. I also decided to eliminate the waist gap between those puffy side panels. To do this, I stitched the back closed at the base of the dress (basically adhered the Velcro and stitched at the bottom). Finding the center back seam and front seam, I lined up the edges of the puffy side panels so that they touched but did not over lap. Also, I started out with a 22"x22" square for my puffy side panels and then made my circles.


Credo,
Lisa


Tuesday, August 30, 2011

Pattern Review: Oliver + S Little Things to Sew - Bucket Hat

Hi,

  For the last month or so, I've been seeing the cutest little patterns from Oliver + S. Everything I've seen, I've wanted to try. I happened upon a Sew-a-long for the book Oliver +S Little Things to Sew by Liesel Gibson at A Little Gray. Basically, the sew-a-long is one project per month from the book. The August project is the Bucket Hat. Check out the details here:


I've been wanting to try a sew-a-long for quite some time and this is a great excuse to buy the book! And, I'm soooo glad that I did. My little bucket hat, side 1...

It is reversible (side 2)...
Personally, I just think a tiny hat is adorable, don't you? Infants are great fun to sew for.

Let's get on with the actual pattern review now....

This is the 1st pattern (Reversible Bucket Hat pg 33) I tried from the book. I quickly read through the instructions and they seemed straight forward. Each pattern has a difficulty rating. Reversible Bucket hat has a difficulty of 2 scissors out of 4 (4 being the hardest). Full size patterns are included in the book. However, they are glued (with those clear gel like circles) to both the back and front book covers. I did have some difficulty pealing the pattern away from the front cover and ripped the book cover. As a warning, peel very slowly and be prepared to tear the inside of the book cover. The little gel like circle adhesives came off the pattern sheets very easily. Seems like an envelope for the patterns would of worked better but I consider this a minor annoyance and would still purchase the book. I selected the extra small (18" inside crown measurement that fits 6 - 12 months). There are other sizes (small/19"/12-24 months, med/20"/3-4 years, large/21"/6-8 years). I measured lil' AC who is 3 and she fit right into the book's sizing given her age group. The bucket hat had no layout instructions for this three piece pattern. While cutting it out, I realized that this pattern is GREAT for using up your scraps. It really takes almost no fabric. The instructions call for 1/3 yard of each fabric. Just think of the possibilities of mixing brim, crown and band fabrics to create some great looking hats. I stuck with this fabric scheme because I wanted to add to my Kimono style PJs ensemble my husband had gifted to a friend earlier in the month. It took hardly any time at all to cut out the pattern pieces and attach the interfacing. The directions called for sew-in interfacing but I don't have any and the iron-on worked just fine for me. My fabrics are cotton but seemed lighter than most cottons. The directions only call for interfacing one side of the brim but in retrospect, I think I should of lined both sides. I think I would of liked a little more stiffness in the brim. (Note: the optional top stitching does give the brim more body too.) I followed the directions in the Assemble the Cap portion exactly. I found that it was best to use a lot of pins in step 2 (sewing the crown to the band) and to make lots of clips/slits to ease in that curve.


There was also a noticeable amount of difference in "give" for each of my fabrics. The solid navy fabric had almost no give and it was harder to ease in and required more work in the form of lots of pins and clipping. The "checkered" fabric had lots of give and the crown and band eased in very nicely. I was working with true scraps as I cut out the fabric pieces and I may not have cut correctly on the grain and that could of influenced "fabric give". Next time, I will give my fabrics a little tug to test the give before making my final choice. I also did the top stitching at the crown. It seems to help keep the hat shape better.

The next section, Making and Attach the Brim, is where I deviated from the instructions. Because I had the wisdom of Jessica at A Little Gray, I only did steps 1 and 2 and did a portion of step 3 (making the brim). I did sew the brim pieces together, as the book suggests, but then I followed Jessica's lead and sewed each brim to its matching cap portion. This gives you 2 hats.

Jessica's method eliminates the need to hand sew the cap (crown and band) to the brim as depicted in Step 2 in Finish the Hat section. Time is always a premium for me and machine sewing is a lot faster.

I added the little baseball patch to the navy side once the brim was attached to the cap. Better... less boring now.

Taking the two hats and placing them right sides together and matching the notches, as Jessica suggests, I sewed the edges of the brims together using a 1/2" seam allowance (as the book directs) but I left a 2.5 gap.
That might be a bit hard to see but take a look here. I trimmed the seam down to 1/8" except where the open gap was. This is an important step in Jessica's deviation... don't trim that un-sewn brim portion (that 2.5" gap). Once I turned it right sides out, I first finger pressed the brim edge as directed by the book. I wasn't pleased with the result and then pressed it with the iron to tuck in the open seam and even out the remaining brim seam.
At this point, you can start making your brim top stitching. I did get some wrinkling in the brim area that I left open for turning but I was able to smooth that out after I pressed the brim. 

In summary, I really like the bucket hat because it went together quickly (maybe an hour of sewing time), the instructions were easy (the ones that I did follow), and I can see lots of great fabric combinations. I'll be sewing another bucket hat for lil' AC next.

Next month's sew-a-long project is that cute little penguin backpack. I hope you can join Jessica's Sew-a-long!!

Credo,
Lisa

Amy Butler's Little Stitches for Little Ones - Kimono Style PJs (boy version)

Hi!

  I was happy with the girl version and the ease of construction with Amy's Kimono style PJs. The hubs liked it too and wanted me to do a boy verison for one of his friend's newborn. Here the boy verison I did.


The fabric is from my stash. I'd had it for quite some time.

I also used French seams to construct the garment.


When constructing this garment the 1st time, I got thrown off by the inside strap/ties. Here's a photo of what that looks like and perhaps this will help others:

It's just a simple bias strap sewn in the right inside seam. However, not so simple if you don't know what they are talking about in the instructions!

Since I sewed this in the summer heat, I just couldn't imagine the parents putting those little booties on the baby. Too hot! I ended up giving the outfit without any booties but I wasn't happy. Just felt like something was missing....

Credo,
Lisa