Pinterest

Thursday, April 15, 2010

Tulle Hair Band

To go along with the Simple Sash Sundress, lil' AC needed something for her hair. Originally, I thought I would make the hair band out of the yellow cotton dress fabric but I thought the outfit needed more white to make the rest of it stand out more. I had some plain white cotton but it just seemed like too much white and that's when tulle came to mind. I had measured where the headband would go on my daughter's head. Then subtracted 4". I used the 6" wide tulle that comes on a spool. Love that stuff. I use it as ribbon when wrapping gifts or to decorate a plain basket. I think tulle on a spool is a staple for all crafters. So, I cut the 6" wide tulle the length of her head minus 4". I then cut a piece of 3/8" black elastic 5" long. I chose black elastic because lil' AC has dark brown hair and it blends well. I then scrunched up one tulle end and placed it over the elastic. The tulle covered approximately 1" of elastic. I then stitched the tulle to the elastic about an 1/2 from the edge of the elastic. I did this to the other side and then trimmed both ends of the hair band close to the stitch line. I took a piece of white ribbon and then wrapped it around the tulle/elastic seam stitching. I wrapped about 2" worth of white satin ribbon and then tacked it in place, by hand. It looked like this...

To add a fabric flower, I cut a circle out of the yellow cotton dress fabric. I then cut 2 pieces of white tulle slightly smaller. The tulle circles were approximately the same size, about 2.5" in diameter. To make the ends curl, I burnt the ends with a lighter like this.
I burnt the inner petal more than the outter to make it smaller. I then layered the circles. The cotton was at the bottom followed by the tulle from largest to smallest. I then pinched the center with my fingers until I was happy with the way it looked and then used thread and needle to keep it's shape. I then added the extra button I made for the dress to the center. I just attached it with needle and thread.

Here's the finished product...


Credo,
Lisa

Tuesday, April 13, 2010

Simple Sash Sundress

A couple of weeks ago I made lil AC a dress from Kari Mecca's Sewing With Whimsy.

The dress I chose was the Simple Sash Dress. This is the 1st dress pattern that I used from her book. I found the instructions to be well written and easy to follow. The only problem I had was putting in the bias bound placket. However, since this was my 1st time doing one, I think it turned out okay. The instructions for French seams were very clear and this was also the 1st time I did an entire dress with French seams. I think it makes a world of difference and I really like how clean (lack of stray threads) the inside looks.

Here's how lil AC's dress turned out...


The front
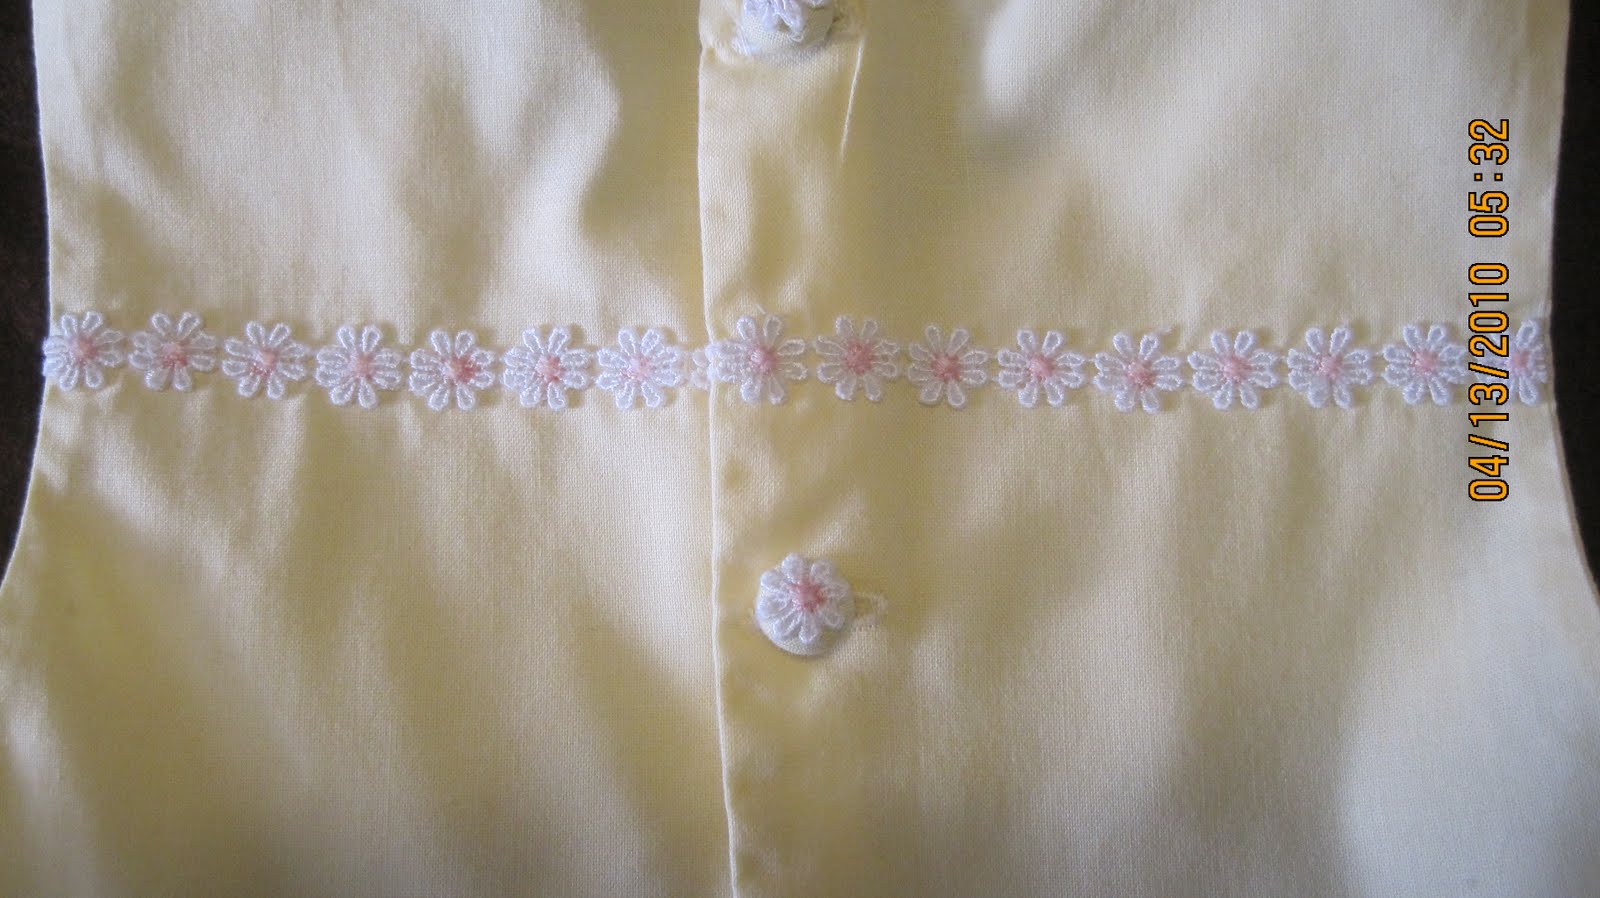
Close up of the trim on the bodice and hemline:


The back of the dress:

Close up of the back and buttons

I was pleased with the way the trim lined up on the back. I started to look for vintage type buttons but I couldn't find anything I was really happy with. So, I just decided to purchase on of those button cover kits. I used the yellow cotton fabric and to separate the flowers from the trim, I just cut the thread between the 2 flowers. Using my sewing machine, I stitched the flowers onto the yellow cotton fabric and then followed the instructions for creating a button. It suggests that light or thin fabric can be doubled. I tried that but the fabric was really too thick to snap in that button cover.  Here's a close up of one of the extra buttons I made and ended up using it in a hair band for lil' AC.

It was a good little sewing project and I'm glad I got the book!


Credo,
Lisa

Monday, April 12, 2010

Bunny Hair Pin

My SIL made this cute little bunny hair pin for lil' AC for Easter. She sold quite a few of these to the mom's at her kids school. She's crafty and enjoyed making them. Certainly a win/win!

She started off by covering the hair clip in with 3/8th light pink ribbon.

The body is done next. The body consists of 2 bottom body loops which are just like the loops for the ears and then the full body loop which includes the face. One bottom body loop is done in the light pink, approximately 3" in length. The 2nd body bottom loop is done in white and is slightly longer in length (maybe 3.25"). The the last loop makes up the face and the body. Essentially, you make a figure 8 with your white ribbon, making sure to make the top of the 8 smaller then the bottom of the 8. Then you will use your glue gun to glue down the top of the 8 to form the face. The length of the body ribbon is approximately 6" long. Next you can add the ear loops which are made from a two 3" pieces of ribbon. The inner ear loop is pink and the outter is white. You finish up with the wiggle eye and the 1/8" blue ribbon for the bow.

She also made this really adorable duck hair clip!


Credo,
Lisa

It's been a while...

Time... it just slips by too fast. Although I have been absent from my blog, I have been busy (working, being a mom, sewing, etc.). It seems that I have been doing a lot of blog surfing too. I am amazed at all of the talented women out there who seem to do all the things I do but still manage to blog regularly and create such beautiful works of art. I have great respect and admiration for your talents and drive. I have so much learning to do.

   So, what have I learned lately? Well, the day before my MIL's 90th bday party I decided that little AC's dress needed a slip to go underneath it. Luckily, I had purchased a pattern from Martha Pullen, Fancy Slip and Panties, which would work. Plus, at my last MP event I had purchased some extra fabric and I had won some free lace that would work perfect for the slip. The slip was easy to put together but I didn't do it exactly as the instructions suggested. Because the dress I made, had a wide arm hole and lower neckline, I was afraid that the lace at the neck and arms would peak through. That's not what I wanted. I needed to finish off the neck and arm seams a bit differently. I decided to set my serger, Pfaff  788, to a flat rolled hem. This is where the learning started. I'd never done this before on my serger. In fact, I think I'm like most people who have a serger... I'm terrified to move any of the setting for fear it will not work again. I'm slightly comfortable with changing the thread but remove one of them or even remove a needle??? Are you kidding me? On any normal day, I'd say "No, way! Stay the heck away from my serger." Who knows what possessed me but I did give it a whirl. I 1st tried the 3-thread rolled hem and I thought it was too bulky. Then I tried the 2-thread rolled hem. Just perfect! I followed the manuals instructions and had no problems. Of course, I must admit that I have yet to put it back to a regular 4-thread serger stitch but that's beside the point! When I serged the 2-thread rolled hem on both the neck and arm seams, I did not shave off any of the fabric. I just serged the edges and then took it over to my Viking Designer Diamond. (Before I forget, I also used the 2-thread rolled hem to attach the lace to the ruffled trim at the bottom of the slip.)

I turned the serged hem over about 1/4" and then used the shell edging stitch (#26) to finish the edges.

I was happy with my 1st attempted at using the shell edging stitch. Here's what the slip looks like:

I also decided to use French seams for the side and shoulder seams. The Fancy Slip pattern had instructions on how to do French seams but I had just tried them with the dress and was happy with the results. I decided to stick to those instructions (Kari Mecca's Sewing with Whimsy) because I had been successful the 1st time I tried it. I did briefly look at slip instructions for french seams and they did seem easy to follow.

I chose to put some embroidery on the slip to dress it up a bit more. I made this decision BEFORE I sewed the side seams. Basically, right after I cut it out. I chose white on white so that it makes the design more subtle. I used Martha Pullen's 2009 May Redwork design for the slip front. Since the design is approximately 3.5" tall, I knew that I wanted the design to start no farther down then 2" from the neckline. Since I still had to finish the neckline but I wasn't sure how much the seam was going to take, I just measured 2" down from the neck edge and marked it with a disappearing ink. To center the design, I folded the slip front in half (side seams together), marked where it reached the 2" neck mark and then came down another 1.75" to make the final CENTER mark. Since the design is 3.5 inches tall, I needed to find the center point (3.5/2= 1.75"). I used Floriani Perfect Stick because I don't have to "hoop" in the traditional sense. Perfect Stick has a sticky side which allows you to just place your fabric onto the hoop without having to stretch it into your hoop and get it perfectly aligned. I use Perfect Stick a lot! I take the appropriate hoop and trace the hoop size onto the back of the Perfect Stick and cut it out. I then remove the relief paper which exposed the sticky part. I place the stabilizer on a table with the sticky side up and then put my hoop on top of the sticky stabilizer in the shape of my hoop. I make sure that it's properly covering all corners of the hoop. I put my hoop onto my machine and then I can just drop my fabric onto my hoop and smooth it out. If I don't get it aligned right the 1st time, it's VERY easy to pick it up and readjust. Super simple and I love this technique! In fact, I started the embroidery design and then ran out of the house to go to the movies with the family. When I came back, it was all finished and looked like this...
I like the design because it's delicate and that's what I wanted for little AC's slip.


For this little sewing project, I learned how to use my rolled hem on my serger and that I love stitch #26 (shell edge) on my Designer Diamond.


Credo,
Lisa

Tuesday, February 16, 2010

The Chenille Jacket

Since I was pregnant with my baby girl, I've been obsessed with sweaters and jackets for her. For some reason, I've been convinced that this little desert baby was going to be cold even in August. As a result, she's got enough sweaters and jackets to keep all the babies in any Alaskan nursery warm. (Ok, maybe that's a bit of an exaggeration but I think you get the picture.) …When I ran across Pat Liu's jacket designs which included creating your own chenille fabric, I knew this was something my baby girl needed to have. I had never considered creating my own chenille fabric and was concerned that it would be quite time consuming. Perhaps because the jacket was small, sized to fit an 18month old, the chenille process was rather relaxing and did seem to go by relatively quickly. To create the chenille in this jacket, I used regular plaid fabric. However, gauze type fabrics work best, as they "chenille-up" quite nicely. Other fabrics that will work are Osnaburg and even denim. The trick to getting your fabric to chenille is sewing and cutting your fabric on the diagonal. In other words, your stitching will be done on the bias or using the plaid fabric as an example, your stitching would NEVER follow the vertical or horizontal lines of the plaid. For this jacket, I stacked 4 layers of green plaid, a ecru cotton which would be used as a base for the green plaid (chenille) fabric and the bottom layer was the lining fabric (purple pansy fabric). I chose ecru because it matched the purple pansy fabric I used. I could of used a green cotton but I would of had to work and searched a little harder to match the green in the plaid. And as always, I was in a hurry to get this project started and didn’t want to keep searching for the “right” green fabric. I was also having a hard time finding a matching green gauze fabric to match my lining fabric. (I had started with the pansy fabric because I really like it and I love the green and purple combo.) In the end, the green plaid was a good choice for the lining fabric. I basted around the edges to keep my layers together and then cut out my pattern pieces and sewed the jacket together. Any jacket pattern with raglan sleeves works nicely when creating your own chenilled garment. Once the main pieces of the jacket were stitched together, I stitched my diagonal lines ½ inch apart. Once my diagonals were stitched, I carefully cut through all layers of the plaid withOUT cutting the ecru cotton backing or lining fabric. Each cut was made in between each stitching line. I also quilted the pansy fabric and then added the purple bias tape trim. The last step was to wash the jacket to help the plaid fabric fray which gives the look of chenille.


Here's the back...

View of the lining fabric...

Close up photo of the chenilled fabric...

With each machine washing and drying of the jacket, the fabric continues to "chenille-up" very nicely. Please let me know if you've tried to chenille your own fabric. I'd love to see what you've created.

Credo,
Lisa

Thursday, January 28, 2010

Christmas Ornament Tradition

 have always loved the idea of traditions. I think it gives people a sense of belonging and security.  Of course, not all traditions are fabulous. I had an uncle who always greeted me with the dreaded "pull my finger".  Good grief!!! I think we can all agree with getting rid of that tradition! Oh, brother!!!

Of course, my vision of traditions is more on the lovely side of things... For instance, while we were dating, my husband and I picked up a personalized Christmas ornament. We weren't even engaged but I thought it was kinda cool and his tree needed some serious help. Little did I know that very same Christmas, he would ask me to be his wife.  Since that Christmas, we've purchased an ornament every year to put on our tree. As time progressed, we started picking an ornament which reflected something that happend during the year. Maybe an ornament from our summer vacation or a house ornament to signify the purchase of our home. As our family grew, I then started collecting a hubby and wife ornament, a family ornament, and an ornament for each child. The ornaments now had a story behind them and to save those stories I decided to create a scrapbook of my Christmas ornaments. It's a very quick and easy project. Who doesn't like that? Here's what I do... I take a photo of each ornament, add it to my Ornament Album, and then journal the story behind the ornament (the reason why I bought or made it). That's it! Task completed. Yippee!

My Ornament Album contains only photos and stories of our family ornaments. Here's what mine looks like:
The album is an 8x10 Creative Memories album which is no longer available. The size suits me just fine and I've got enough pages and page protectors to last me for another 60 years! I can usually fit each year's ornaments on one page with enough room for journaling.

Here's the cover page. I did this page many, MANY, MANY years ago. It's interesting to see how my scrapbooking style has evolved over the years. In scrapbooking, I'm a firm believer in once it's done, it's DONE! I would never redo a page because there are so many pages yet to be completed for the 1st time.


Here's a sample of what some of my pages look like. The pages were never meant to be fancy but to focus in on the story behind each oranment.


I've also decided that when each child finally marries, I will hand over all their ornaments so that they can grace their own tree. My hope is that they will carry on this tradition with their family too.

Credo,
Lisa

Sunday, January 24, 2010

Cricut Cake

I attended the Craft and Hobby Association's Craft SuperShow at the Anaheim Convention Center yesterday. This is the 1st time I've ever attended and I was just thrilled with the number of vendors, product being offered, the Make N Takes, and the quality of the show. There were well known sponsors with some great Free Make N Takes such as Cricut, Jo-Ann, and Michaels. Hobby Lobby even had a large both and the closest store is in Redlands which is at least 50 miles away!

Seems like the big buzz of the show was Cricut with the introduction of their NEWEST product, the Cricut Cake. All bakers are going to love this new product. The Cricut Cake appears to work and look like their signature Cricut but this model cuts fondant or frosting sheets or gum paste, etc. Imagine the precise and intricate designs your can create quickly with the Cricut Cake. Of course, the Cricut Cake mechanical parts are food and dishwasher safe and all Cricut cartridges are suppose to work with the Cricut Cake. The possibilities for cakes, cookies, cupcakes, etc. are so very exciting!

At the Cricut booth, the Make N Take with the Cricut Cake was a cute cupcake. We were given material to create a box to hold our cupcake which was cut by a Cricut. Then we were given a cupcake and our choice of cut frosting. I choose the scalloped chocolate circle. On top of the scalloped circle, I placed a smaller and thin scalloped white circle and then decorated with confetti shapes cut from the Cricut Cake. It was a very darling ensemble. For more information, check out the Cricut website here.

Sadly, my little Cricut Cake ensemble did get a bit mashed in my bag. Sorry! Here's the cupcake in the box I made.


Here's the complete package.


The Cricut booth also had another free Make N Take which focused on using their dies with the art of quilling. The emphasis was on making the 3 flowers centered on the plaque below. The plaque was already painted with the filigree work. Using precut vinyl letters we added "Always & Forever" and then glued the leaves and flowers to create this plaque. This Make N Take was quite time consuming but fun.


Close up of the flowers. And I seriously need to learn how to take better pictures!


The cost of the show was $15 and a $3 coupon was available. The show ran for 2 days, Friday and Saturday. To learn more about CHA, check out their website.

Credo,
Lisa